
Writing and Testing
Your First Script
(Lesson 2)
Opps! Sorry, there I go showing some of the power of JavaScript instead of teaching it. I will try to keep my mind on the teaching for the rest of this lesson :-)
What is
JavaScript?
I have already shown you that JavaScript can be used to display a specific greeting based on the time of day and can be used to generate a simple clock.
It can also display today's date and time in many different formats:
It can put scrolling text on your page:
It can put a drop down menu on your page:
This menu has been disabled but you will will learn how to do the real thing is this class.
It can get basic information about your visitor and his Browser:
It can do some cool things with images, such as a rollover:
![]()
It can do pop-up windows:
Click here to view a JavaScript pop-up window
It is fast:
JavaScript is 100% text, just like HTML is. Therefore it loads quickly from the server to your computer. JavaScript runs on your computer and does not have to download any additional applications to do it's job.
It can be mixed with HTML:
You use the HTML tag combination <SCRIPT> </SCRIPT> to identify JavaScript. This makes it HTML friendly.
It can be annoying to your visitors:
- if you use too much.
- are more interested in doing cute things rather than adding functionality to your page
- take away some of the browser features that your visitor relies on, example using the status bar at the bottom of your browser for something that keeps your visitor from seeing normal messages.
It can be frustrating to develop:
When you make a mistake and try to trouble shoot. But so can HTML! Have you ever left off a closing tag such as </FONT> and spent some time trying to find the mistake among the many tag combinations on your page.
It is Object Oriented:
JavaScript is composed of what is called objects that have properties and methods. The window that you are now using is an object that has properties such as height and width. Methods do things for us. For instance, I used a JavaScript method to open the pop-up window in the demo above. The pop-up window contains a close button. Pressing this button causes another JavaScript method to run and close the window. We will be talking about objects in lesson 7.
It is not Java:
Java is a compiled language, i.e. put into machine language before it gets to your computer. JavaScript is an interpreted language, i.e. put into machine language on your computer. The coding in JavaScript is somewhat similar to Java but it is much less restrictive. For example, as you will learn in lesson 4, JavaScript allows you to assign any type of value to your variables. Java does not. Java is a language that experienced programmers use to develop applications. JavaScript is for us less experienced web developers. JavaScript was originally developed independent of Java by Netscape under the name of LiveScript. Netscape changed the name to JavaScript in 1995 as a result of an agreement with Sun, the developer of Java.
It is called jscript by Microsoft:
Microsoft Internet Explorer browsers have what is called jscript. The results from a browser that has jscript is basically the same as one that has JavaScript. The documentation that Microsoft provides makes it look a little different. Call it what you want to, the bottom line is that JavaScript works on the Internet Explorer browsers.
Our First
Script
Let's start our journey into the learning of JavaScript by typing in
the following HTML code. We will add to it and eventually wind up with a
working clock similar to the one above. Of course it will take us a
several lessons to get there because we first need to learn the basics.
 <HTML>
 <HEAD>
 <TITLE>Our First Script</TITLE>
 </HEAD>
 <BODY>
 <CENTER>
 <H1>Our First Script</H1>
 </CENTER>
 <P>Today is
 </BODY>
 </HTML>
Save this code as script1.html. It looks something like this
when we load it into our browser by using File/Open on the menu.
|
Today is |
Not very exciting! Lets add some JavaScript to our code. Add the
following script after the line <P>Today is <SCRIPT Language="JavaScript">
var today = new Date()
document.write(today)
</SCRIPT>
Your html code should now look like this. <HTML>
<HEAD>
<TITLE>Our First Script</TITLE>
</HEAD>
<BODY>
<CENTER>
<H1>Our First Script</H1>
</CENTER>
<P>Today is
 <SCRIPT Language="JavaScript">
 var today = new Date()
 document.write(today)
 </SCRIPT>
</BODY>
</HTML>
Save this script and reload it into you browser. It should render
something like this:
|
Today is
|
Still not real exciting, but remember this is only our first script
and does demonstrate something you can't do with plain HTML.
The <SCRIPT>
tags
As a quick review, a simple HTML tag has the following syntax:
 <TAG-NAME [ATTRIBUTE=["VALUE"]....]>

    (some text)

 </TAG-NAME>
The HTML tags that are used to identify JavaScript are
<SCRIPT
language="JavaScript"> and </SCRIPT>. All text between these
two tags is interpreted as JavaScript code by the browser that has the
capability (Netscape 2+ and Internet Explorer 3+). The tag contains one
attribute language
that has the value "JavaScript". You will probably find that your scripts will
work if you leave this attribute out. This is not recommended since
(1) the attribute identifies the code as JavaScript to someone
reading your source and (2) future browsers may require that this
attribute be defined to distinguish it from other languages. The
book recommended for this class does not enclose "JavaScript", the value
of the attribute, in quotes. However, it is conventional
and recommended that quotes be used.
Most browsers in use today have some version of JavaScript built in. However, there are still a few in use that don't understand JavaScript. These browsers will ignore the <SCRIPT> tag but will display the text between the tags. To prevent this, the JavaScript code is enclosed by a combination of the HTML comment tag <!-- --> and the double slash ( //) that is used in JavaScript to identify a comment. The result looks like this <!-- //-->.
The complete template for JavaScript is therefore: <SCRIPT language="JavaScript">
<!-- hide from old browsers
(some text that is JavaScript code)
//-->
</SCRIPT>
Another format of this same template that is more compact is <SCRIPT language="JavaScript"><!--
(some text that is JavaScript code)
//--></SCRIPT>
Use whichever template that you feel the most comfortable with.
Our completed first
Script
Ok, add the two necessary lines to our first script to hide it from
older browsers. Our completed html code should now look that shown below.
Make sure that you reload the script in the browser to prove that it still
works the same. <HTML>
<HEAD>
<TITLE>Our First Script</TITLE>
</HEAD>
<BODY>
<CENTER>
<H1>Our First Script</H1>
</CENTER>
<P>Today is
<SCRIPT Language="JavaScript">
<!-- hide from old browsers
var today = new Date()
document.write(today)
//-->
</SCRIPT>
</BODY>
</HTML>
A little about the
JavaScript code in our first Script
Look closer at the completed version or our first Script. You should now be able to identify the <SCRIPT> tags and the text that is used to hide our code from the older browsers. The remaining two lines between the <SCRIPT> tags is JavaScript code. The first line initializes a date object. Date objects will be discussed in detail in a future lesson. The other line of our code is a method of the document object which will be also be discussed later. For now, all you need to know about it is that you can use this method to write information to the document contained in your browser.
Where to put
Scripts
We already know that we can put scripts between the <BODY> and </BODY> tags because that's where we put our first script. You can put JavaScript anywhere in the BODY section of HTML code. Now I am going to do something daring and ask you to look at my HTML code for this page. Please be nice now and don't find too many faults (LOL). Ok if you look in the head section, you will notice some <SCRIPT> tags there too. So, yes you can put JavaScript in the HEAD section also. Notice that the word function is used several times in the HEAD section. A function is something that we will learn about real soon. Just wanted you to note these and get the idea that the HEAD section is where you might put your functions. So it turns out that JavaScript can be placed most anywhere in our HEAD and/or our BODY sections. As you learn more about JavaScript, you will understand when you should put it in the HEAD section and when it should go in the BODY of the document. You will also learn that JavaScript can also be placed inside other tags, such as the <BODY> tag.
Test Script using
Browser
You might be surprised to see that the results of this simple script are
not the same on both browsers. In a later lesson we will show how to make
the results the same. This is just one small sample of how the results can
be different on different browsers. There are many times that a
script will run perfectly on one browser but not on the other. So test,
test, test.
Our first
JavaScript Error (hopefully!)
I say hopefully because you might have already experienced this if had a typo in our script right above. Now to demonstrate one of the important characteristics of JavaScript, change the words document.write to all caps like this DOCUMENT.WRITE(today). Save your file and reload it into the browser. Surprise! What happened? You got your first JavaScript error. Better get use to it. I try to do my work in small chunks so I can weed out the errors more easily. The more practice with error messages you have the easier it will be to decipher them.
Here is a sample of how the error will look on the Netscape and Internet Explorer browsers. Yours may vary a little from this.
)
Netscape 4
(click on image for larger view)
)
Netscape 4.5 Console
(click on image for larger view)
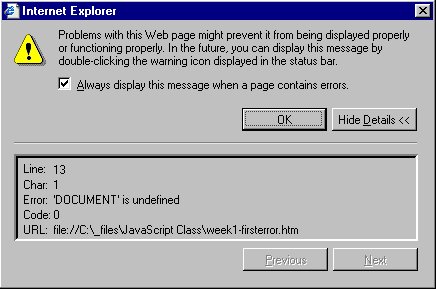
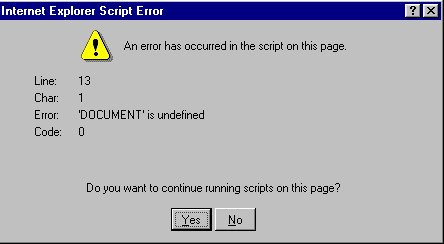 Microsoft Internet Explorer 4
 Microsoft Internet Explorer 5
Ok so what caused our error here? The answer is "JavaScript is case sensitive". When I was first setting up this demo I entered Date as date. It took me a while to find out what was wrong. So be careful when you are entering JavaScript code to get the case right and be aware that it is likely that the wrong case could be your problem when you get a JavaScript error.
Notice that all of the error messages show a line number that the error occurred on. In our simple case the line number is exactly where the error occurred. This will not always be the case as our scripts get more complex. However, it will give you some clue as to where to start looking. The error call out can be a little confusing and needs some getting use to.
You probably want to change the case for "document.write" back to all small letters in our example script, save it and make sure it runs ok before we proceed further.
More about document.write()
The document.write() method is one that you will be using a lot.
For now, don't worry too much about what a method is beyond our basic
explanation we gave when we talked about JavaScript being Object Oriented.
We will explain that and why you see the period between the words document
and write during lesson 7. Just realize that you can use this method to
write a string to the document while it is loading. The syntax for the
document.write() method is
as follows: document.write("string")
So, what is a string? As we will learn in lesson 4, it is nothing more than a series of characters. You put the characters in quote marks, except when the string is something that is returned by another method, which was the case in our first script, or is a variable which you will also learn about in lesson 4.
So if we wanted to write Welcome to my Web Page using document.write(), this is how we
would do it: document.write("Welcome to my Web Page")
You can include HTML tags in this string if you want. For
instance, we can make our welcome bold by doing the following. I will add
a second line too. document.write("<P><B>Welcome to my Web Page</B>")
document.write("<BR>Glad you stopped by!")
Now suppose we want to use document.write() to insert an image in the document.
Normally we would use the <IMG> tag to do this. For instance, the
tag would look something like this if we were inserting our pet's picture
named pet.gif. <IMG src="pet.gif">
We will need to put quotes around this when we use it with
the document.write()
method. This will mean that we will have quotes within quotes. This will
not work but there is a solution. You alternately use single quotes and
double quotes in JavaScript if you need to put quotes within quotes.
Heres how we would do our image: document.write('<IMG src="pet.gif">')
or document.write("<IMG src='pet.gif'>")
Either way will work fine.
Ok, so it is true that we can do this much simpler by just typing our words into the document itself without all this document.write() stuff. After we learn a little more JavaScript we will be using this method to dynamically create sections of a web page which is actually what we did with our first script. In fact you can create the complete document for a web page using document.write().
Don't forget that you must put our above example scripts between the <SCRIPT> </SCRIPT> tags for them to work.
Confused
yet?
So are you completely confused yet? If you can
- Identify the <SCRIPT> tag.
- Know how to hide your scripts from older browsers.
- Look at someone else's source code and identify the parts that are JavaScript (by identifying the <SCRIPT> </SCRIPT> tags of course and knowing that all in between is JavaScript).
- Know that you can use the document.write() method to write to the document as it is loading.
- Understand that the results you get from JavaScript may be different for different browsers and in fact may not work in some cases.
Then I would say you have learned a great deal in this lesson and
are ready to move on and learn the basics on JavaScript.
Assignment
- Surf the web and try to determine where JavaScript was used. Note pages that used JavaScript in an effective way.
- Make a very simple web page using a series of document.write() methods to generate everything that you will see on the screen. This means that all of your BODY section will be a series of document.write() methods. Include at least one image in your web page. You might even want to include the date as we learned how to do in our first script. Realize that this is not the best way to do this simple web page but it does prepare us to do bigger things soon.
[ Top of Page | Contents ]