
(Lesson 11)
Well, we have gone about as far as we dare without introducing you to the JavaScript object hierarchy. Try not to become too confused by the fact that this model does not seem to be consistent. It varies depending on whose book you are reading or whose web page you are on.
We will also talk about the Location Object, the History Object, and show you how to automatically put a revision date on your pages using one of the properties of the document Object.
Object Hierarchy
Take a look at the Netscape version of the object hierarchy shown in the figure below.
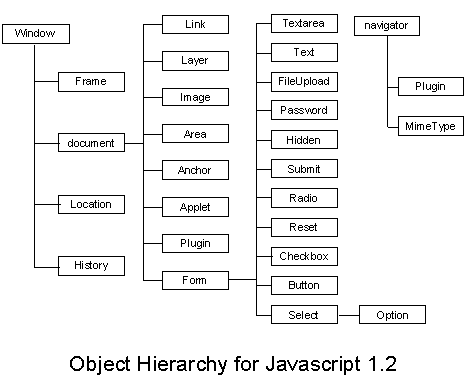
It is obvious that the majority of this diagram involves the document object. The good news is that most everyone basically agrees with hierarchy of the document object as it is shown here. There seems to be a disagreement on the location that some of the other objects fall in the hierarchy between books and web pages however. For instance, Danny Goodman does not show a separate frame object in his JavaScript Bible. He treats it synonymous with the window object. I tend to agree with his approach.
Remember the dot syntax that we discussed in lesson 7. The
object hierarchy is supposed to help us determine the right dot syntax for
relationships between objects, and for the most part it does. In lesson 7,
we referred to the text box on a form using the following dot syntax.
document.formName.textBoxName.value
You can easily follow the path to the text object of the
form using the object hierarchy shown above.
We have already discussed some of the properties and methods of the document and form objects. I will try to cover most of the more popular properties and methods of the other objects during the remaining lessons. Hopefully, this will give you adequate know how to research any additional properties and objects that you might want to use.
Location
Object
The Location object deals with the URL of the current window object. It contains properties and methods to allow you to analyze and change this URL. The Location object contains 8 properties and 2 methods as summarized here:
| Property Summary for Location Object | ||
| hash | Specifies an anchor name in the URL. | |
| host | Specifies the host and domain name, or IP address, of a network host. |
|
| hostname | Specifies the host:port portion of the URL. | |
| href | Specifies the entire URL. | |
| pathname | Specifies the URL-path portion of the URL. | |
| port | Specifies the communications port that the server uses. | |
| protocol | Specifies the beginning of the URL, including the colon. | |
| search | Specifies a query | |
| Method Summary for Location Object | ||
| reload() | Forces a reload of the window's current document. | N3+, IE4+ |
| replace() | Loads the specified URL over the current history entry. | N3+, IE4+ |
The href property contains the complete URL and the remaining 6 properties allow you to get various portions of this URL. The href property is the most commonly used one and will be the one that is discussed here.
Using document.write(window.location.href), I can determine that the URL of this page is:
I can also load a new page using the location object. Shown below are
three ways that you can do this: window.location = "http://www.JavaScriptMall.com"
window.location.href = "http://www.JavaScriptMall.com"
location.href = "http://www.JavaScriptMall.com"
The top method is the recommended one. This is one case
where it is best to use the window in the dot syntax statement. The reason is the
document object also contains a location property and JavaScript will
sometimes use it instead of this location object when the window keyword
is omitted as shown in the third example (The location property of the
document object is being phased out by Netscape who no longer documents
the property.). Netscape's documentation says that the first two
statements are identical but gives no explanation as to why the first
method works best. Danny Goodman's JavaScript Bible pointed out that the
first statement will work in Internet Explorer 3 where the second is not
always dependable. So the bottom line is to use the technique show in this
example to load a web page into a single window. window.location = "http://www.JavaScriptMall.com"
If you are using frames then you will need learn to use the keywords parent or top, both essentially mean the same thing. The parent keyword refers the frame that contains the <FRAMESET> tags. It is the top most frame. To get the URL of the top frame, or to load a page into it, you use the parent keyword in place of window, parent.location. You can also load refer to one of the frames provided that you have named the frame in your <FRAMESET> tag. You refer to a specific frame by using parent.nameOfFrame.location. Two of the problems in this lesson's Assignment deal with frames and demonstrates how information stored in the parent frame can be used by all the frames in the set.
History
Object
The browser maintains a list of the most recent URLs visited. This list of URLs is represented in JavaScript by the the History object. The History object contains 4 properties and 3 methods as summarized here:
| Property Summary for History Object | ||
| current | Specifies the URL of the current history entry. | N4+ only |
| next | Specifies the URL of the next history entry. | N4+ only |
| previous | Specifies the URL of the previous history entry. | N4+ only |
| length | Reflects the number of entries in the history list. | |
| Method Summary for History Object | ||
| back() | Loads the previous URL in the history list. | |
| forward() | Loads the next URL in the history list. | |
| go() | Loads a URL from the history list. | |
You can find out more about the these properties and methods by reading the Netscape Guide on the History object.
I find the back() method to be very useful as a tool for navigating web
pages. The back() method acts like your back button on your browser and
allows you to return to the previous page. This is real handy when you
have links to a particular page from several pages and want to return to
the page that called it. Here is how you would set this method up using a
button on a form. <FORM name="myForm">
<INPUT type="Button" name="myButton" value="Back"
onClick="history.back()">
</FORM>
A Little more about
document Object
We talk more in depth about the document object in the next lesson.
Since I have mentioned several other simple JavaScript techniques that can
be used to enhance your pages, I would like to talk about the lastModified
property of document object. The lastModified property allows you to
automatically inform your visitors when you modified a particular page at
your site. All you need to do is include the following code: <SCRIPT language="JavaScript"><!--
document.write("Page Updated: " + document.lastModified)
//--></SCRIPT>
Here is how it renders:
The results shown above is the default display you will get from using the lastModified property. You can easily change it to a format that you want.
Take another look at the results show above for our last modified date.
The data and time should look very realistic if you are using a Microsoft
Internet Explorer browser. However, this will not be necessary true if you
are using a Netscape browser. The date and time shown will probably be
that for which the count started for the date Object (you may want to
review this in lesson 8). Why is this? The problem is that this property
does not work on all servers. It worked fine on my previous server, but
not this one. So, you need to test make sure it will work on yours if you
want to use it. I think you will find that it always works on your
computer.
Assignment
Solution
Source
Solution
Source - Frameset
Menu
Enter
Info Results
Solution
Source - Frameset
Enter
Info Results
Notes
[ Top
of Page | Contents ]