Placed in: Home  Programming Webdesign The Mac Skype App menu with CSS3 and jQuery comprar viagra en españa
comprar viagra online
comprar viagra generico barato
comprar cialis generico online
comprar cialis online seguro
comprar viagra online
comprar viagra generico barato
comprar cialis generico online
comprar cialis online seguro
| The Mac Skype App menu with CSS3 and jQuery |
|
If you're a regular visitor of Marcofolio, you know I love to create (and share) some wicked Proof of Concepts (For example: the Polaroid photo viewer and the iPhone Contacts App). They are nothing more than showing some amazing potential of certain techniques. Today, I wanted to transfer the amazing slick Skype (for Mac) layout to your own webbrowser. Not the full layout: Only the menu where all your friends are listed. For the nifty layout we're going to use CSS3 and for the extra functionality (ofcourse) jQuery. 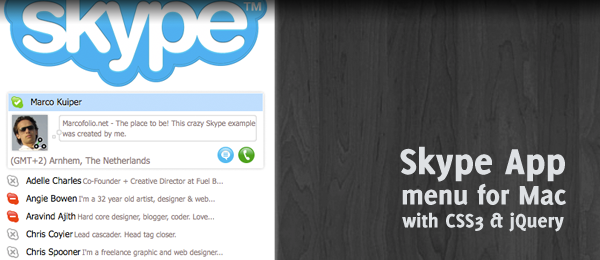
Features:

 Sadly, just like all other CSS3 examples placed here, not all browsers support this functionality. Only browsers that support the OK, here we go! Let's see how you can create one of these wicked Skype menu's yourself. The users listed in the demo are the friends of Marcofolio (same that are placed in the footer) with their Twitter profile picture and links. HTML First things first: We'll need the backbone of this webpage. For that, we'll need a decent HTML structure we can work with. I came up with the following structure on how to build up the page: <div id="skypemenu"> <div class="skypeperson"> <div class="skypename skypeonline">[SKYPENAME]</div> <div class="skypeinfo"> <img src="[AVATAR]" alt="" class="skypeavatar" /> <p class="skypedetails">[SKYPEDETAILS]</p> <br class="break" /> <p class="skypelocation">[SKYPELOCATION]</p> <p class="skypeicons"> <img src="images/Message_24x24.png" alt="Message" /> <img src="images/CallStart_24x24.png" alt="Start Call" /> </p> <br class="break" /> </div> </div> <!-- More Skype Persons --> </div> As you can see, it's not really advanced HTML, but there are loads of classes used that we'll style with CSS. Also, the icons used here are the official Skype icons. Some things that I want to point out:
CSS Now for some interesting CSS that we'll need to add. I've only selected the most interesting parts; Download the source to see the full CSS.
#skypemenu { font-family:"Tahoma"; font-size:12px; box-shadow: 0 0 10px #adadad; border-radius: 5px; background-color:#fff; }
The CSS needed for the overall Skype menu. It sets the font and adds a shadow. The .skypeonline { background-image:url("../images/PresenceOnline_16x16.png"); } .skypeoffline { background-image:url("../images/PresenceOffline_16x16.png"); } .skypeaway { background-image:url("../images/PresenceAway_16x16.png"); } .skypebusy { background-image:url("../images/PresenceDoNotDisturb_16x16.png"); } These are the classes that can be used to change the state of the user. They simply have all another background image to display the status. .skypename { cursor:pointer; text-shadow: #fff 0 1px 0; } .skypeinfo { display:none; } .skypeavatar { box-shadow: 0 0 3px #adadad; width:48px; height:48px; }
That's all the CSS we need for the HTML. But before we can continue with the jQuery part, we'll need some more CSS. Why? Since we're going to manipulate the HTML with jQuery and there's where we need the other CSS. These are the classes we're going to use: .expanded { background-color:#A9D7FF; } .expandeduser { border:1px solid white; box-shadow: 0 0 4px #adadad; border-radius: 3px; } .extrainfo { color:#7D6666; padding-left:2px; font-size:10px; }
jQuery On to some programming with jQuery! After loading jQuery from Google, this is what's going to happen: google.load("jquery", "1.3.1"); google.setOnLoadCallback(function() { addSkypeDetails(); // When a skype name is click, expand it $(".skypename").click(function () { expandSkype($(this)); }); }); As you can see, the first thing that's done is that we're calling a function that wants to function addSkypeDetails() { $(".extrainfo").remove(); // Copy the "skypedetails" when not expanded $(".skypedetails").each(function() { var detailText = $(this).text(); if(detailText.length > 40) { detailText = detailText.substring(0, 40) + "..."; } $(this).parent().prev().append('<span class="extrainfo">'+ detailText +'</span>'); }); } This piece of code first looks for all elements with the The second function ( function expandSkype(parentElem) { addSkypeDetails(); $(parentElem).children().remove(); $(".expanded").removeClass("expanded"); $(".expandeduser").removeClass("expandeduser"); $(".skypeinfo").hide(); $(parentElem).parent().addClass("expandeduser"); $(parentElem) .addClass("expanded") .next().show(); } In short: It removes and adds classes to hide everything and un-hide the one the user clicked on. It also removes the Conclusion and Download We'll, that's about it! Now you should have a fully functional Skype-like menu that you can use on your website. Although it is mainly showing the power of CSS3 combined with jQuery, it does show a nifty effect that could be used on any website.
What do you think of this? Would you use it in your next webproject? Are there any code-improvements that could be added? Tags: skype css3 jquery mac how-to tutorial Interested in this topic? You might enjoy another article I've written called |


| < Prev | Next > |
|---|
| Search |
|---|
| Or try the sitemap |
Friends of Marcofolio.net
 2007 - 2018 Marcofolio.net
This (we)blog brings you information about (web)design, blogging tips, (programming) tutorials and much, much more. I can't describe Marcofolio.net in words: Just look around and be amazed. Many (new) visitors have a habit to stick around, just because of the variety of articles.
Have fun reading this blog and don't forget to subscribe to the feed to keep updated on the latest articles.