


 11/07/2011
 0
0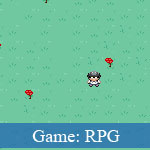 You are being fed up with the JavaScript games and trying to find out how to build Web-based JavaScript games? This JavaScript article tutorial may be a valuable reference source for you in this case.
This JavaScript game making tutorial guides us use a JavaScript game framework - Crafty - to create a simple JavaScript RPG game. This JavaScript RPG game is quite simple but it's so awesome with beautiful graphics, and its gameplay is not too easy to make us feel boredom. Basically, we need to do some necessary tasks such as define the characters, build JavaScript game scenes, create gameplay, making game's animations and combine them into a unified result.
The inner post page will show you all detailed instructions and comments, as well as demo to play with full JavaScript source code for downloading.
- Demo
- Enlarge
- Reload
- New window
Free iPage Web Hosting for First Year NOW
If you're still looking for a reliable web host provider with affordable rates, why you don't take a little of time to try iPage, only with $1.89/month, included $500+ Free Extra Credits for the payment of 24 months ($45)?
Over 1,000,000+ existisng customers can not be wrong, definitely you're not, too! More important, when you register the web hosting at iPage through our link, we're going to be happy for resending a full refund to you. That's awesome! You should try iPage web hosting for FREE now! And contact us for anything you need to know about iPage.
Entities
Let’s create the player entity already! The source code is getting quite large so I will just show the code from the main scene.
Crafty.scene("main", function() {

  generateWorld();

  // Create our player entity with some premade components
  var player = Crafty.e("2D, DOM, player, controls, animate, collision")

    .attr({x: 160, y: 144, z: 1})

    .animate("walk_left", 6, 3, 8)
    .animate("walk_right", 9, 3, 11)

    .animate("walk_up", 3, 3, 5)
    .animate("walk_down", 0, 3, 2);

});
We call the generateWorld() function from earlier and create a player entity with some premade components: animate, controls and collision. Animate is a component to create animations for sprites. Similar to Crafty.scene(), you add an animation and play it with the same method with different arguments. The first argument is the name of the animation, the x position in the sprite map, y position in the sprite map and then the x position of the last frame in the sprite map (assuming the sprites all have the same y; if they don’t pass an array of arrays similar to the Crafty.sprite() method).
The controls component transforms keyboard input into Crafty events. Use .bind() to listen to an event. The events triggered in the controls component are keyup</codE> and <code>keydown. The collision component is a very basic method of calling a function if an entity intersects another entity with a specific component (this is where the labels come in handy such as wall_left, wall_right, etc.).
Note: The .attr() method is used to modify properties of the entity. In this case we position the player in the middle of the screen.
Components
It’s about time we really utilise the Entity Component system and create our first component. The component we need right now is something to control movement. There already exists two components for movement (twoway and fourway) but we want finer control and don’t want diagonal movement.
To create a component use the function Crafty.c(), where the first argument is the name of the component and the second is an object with properties and functions. To have a function execute as soon as it is added to an entity, create a function called init. If you need more information before initialising, best practice is to create a function with the same name as the component (commonly known as a constructor).
Crafty.scene("main", function() {
  generateWorld();
  Crafty.c('CustomControls', {

    __move: {left: false, right: false, up: false, down: false},
    _speed: 3,

    CustomControls: function(speed) {
      if (speed) this._speed = speed;

      var move = this.__move;

      this.bind('enterframe', function() {

        // Move the player in a direction depending on the booleans
        // Only move the player in one direction at a time (up/down/left/right)
        if (move.right) this.x += this._speed;
        else if (move.left) this.x -= this._speed;
        else if (move.up) this.y -= this._speed;

        else if (move.down) this.y += this._speed;

      }).bind('keydown', function(e) {
        // Default movement booleans to false

        move.right = move.left = move.down = move.up = false;

        // If keys are down, set the direction
        if (e.keyCode === Crafty.keys.RA) move.right = true;

        if (e.keyCode === Crafty.keys.LA) move.left = true;

        if (e.keyCode === Crafty.keys.UA) move.up = true;

        if (e.keyCode === Crafty.keys.DA) move.down = true;

        this.preventTypeaheadFind(e);
      }).bind('keyup', function(e) {

        // If key is released, stop moving
        if (e.keyCode === Crafty.keys.RA) move.right = false;

        if (e.keyCode === Crafty.keys.LA) move.left = false;

        if (e.keyCode === Crafty.keys.UA) move.up = false;

        if (e.keyCode === Crafty.keys.DA) move.down = false;

        this.preventTypeaheadFind(e);
      });

      return this;

    }
  });

  // Create our player entity with some premade components
  var player = Crafty.e("2D, DOM, player, controls, CustomControls, animate, collision")

    .attr({x: 160, y: 144, z: 1})

    .CustomControls(1)
    .animate("walk_left", 6, 3, 8)

    .animate("walk_right", 9, 3, 11)
    .animate("walk_up", 3, 3, 5)

    .animate("walk_down", 0, 3, 2);
});
Our component has two properties: __move and _speed. The first is an object of booleans used to indicate which direction the player should be moving. The second is how many pixels the character should move by or speed. We then just have one function, the constructor. We could easily just use an init method here and assume a speed of 3, but we want a speed of 1 so a constructor is needed to indicate that.
We use the .bind() method a fair bit in this component. The enterframe event is called on every frame (depending on the FPS) so when the callback is triggered, it will move the player in a direction depending on which direction is true and by the amount/speed we previously decided.
The other two events, keydown and keyup, simply check which key has been pressed (derived from the event object passed as an argument) and then set the movement boolean. There is a reason why we don’t simply move the player as soon as the key is down. The keydown event will trigger once then have a short pause before calling it over and over until a key is up. We don’t want that pause so we use the enterframe event to continuously move the player. The keyup callback does the same as keydown but in reverse, sets the movement booleans to false if the key has been released.
You will also notice our player entity has our new component in the component list as well as calling the constructor. Our player should be able to move now.
Note: Using an underscore before property or function names is the convention we’re using to convey that it is private.
- Sent (0)
- New
Save up to 630$ when buy new iPhone 15
GateIO.gomymobi.com
Free Airdrops to Claim, Share Up to $150,000 per Project
https://tooly.win
Open tool hub for free to use by any one for every one with hundreds of tools
chatGPTaz.com, chatGPT4.win, chatGPT2.fun, re-chatGPT.com
Talk to ChatGPT by your mother language
Dall-E-OpenAI.com
Generate creative images automatically with AI
AIVideo-App.com
Render creative video automatically with AI
Cool Domains for Sale!
Author:
Previews:
Comment:
Votes:
Sent:
Size:
Rank:
Louis Stowasser [more]
122,993
0
0
0
0.09 KBytes
0 votes / 122,993 previews / 0 comment
11/07/2011
You are being fed up with the JavaScript games and trying to find out how to build Web-based JavaScript games? This Java...Making Simple RPG Game with JavaScript and Crafty - Making Simple RPG Game with JavaScript and Crafty
