


Guest, enregistrer login
 Le menus déroulants  est une excellente façon de comprendre une très longue liste de liens sans dérèglement de la présentation de votre blogroll page. Ce problème peut se faire rapidement et facilement à l'aide de la
 SELECT  tag, toutefois, cette façon de faire votre liste de perdre la flexibilité et l'esthétique.
A travers cet article, l'auteur va vous apprendre comment construire de très belles Blogroll  des liens avec les caractéristiques et les opérations que vous utilisez le SELECT  tag.
Dropdown menus are a great way of including a long list of links without cluttering up your page. The issue though is that they can be hard to style, but look quite ugly if you don't. There isn't a lot of flexibility with HTML's <select> tags.
Well, why not do it with plain HTML instead?
In this post, I'm going to walk you through how I've set up the blogroll in our upcoming redesign. Load up the example page to see how our final product will look.
By using CSS only, you avoid slowing down your page while visitor's download an extra script. On top of that, you don't need to worry about user's having JavaScript disabled.
The only caveat is that this method won't work on IE6 (At least, not without doing some tweaking specifically for IE6 users). But as you'll see at the end, this could be much more accessible than if you used JavaScript.
The HTML we use later won't have any traditional <select> codes, so by itself, it's not going to look anything like a dropdown. We need to take care of that ourselves.
The image you create can look any way you want it to, but since this is a dropdown menu, a little arrow pointing downwards is your best option for easy usability.
The size of the image is also important. It can be any height you like, but the width will be the width of your dropdown.
This is what I have ended up with:
![]()
Now we set up our HTML. This is where the power of this method comes into play, you are using simple HTML that you can later style in any way that suits you.
We need an unordered list to store all of the links. We will then precede that with a paragraph (or a 'h' tag if you prefer) to title it, and finally, we wrap the whole thing in a div.
Your final markup should look like this:
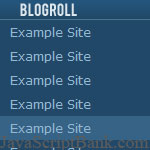
<div class="blogroll">
<p>Blogroll</p>
<ul>
<li><a href="http://www.site.com/">Example Site</a></li>
<li><a href="http://www.site.com/">Example Site</a></li>
<li><a href="http://www.site.com/">Example Site</a></li>
</ul>
</div>
Of course, you may want to use WordPress' wp_list_bookmarks(); function to use the built in linkroll instead. Either will work.
For now we are going to forget about the dropdown functionality, and simply design the dropdown as it will be when someone's mouse is over the image.
The first step is to replace the paragraph text with the image we created earlier.
.blogroll p {
background:url(pbd-css-blogroll-rollover-img.png) 0 0 no-repeat;
width:274px;
height:21px;
text-indent:-9999px;
}
 As you can see, we apply the image as the background first. We then set the dimensions of the paragraph to be the same as those of the image, and finally, we use text-indent to hide the "Blogroll" text from our HTML.
Next we have to style the list. Because our HTML is so simple, you will have no problem styling this any way you like. For instance, you can set a background on the dropdown, or add other types of HTML (Like images).
All I am going to do here is set up a plain list of all the links, and change the background color of each link on rollover. The CSS I've used is as follows: (Feel free to adapt for your own site)
.blogroll ul {
width:272px;
background:#214868;
border:1px solid #48758d;
border-width:0 1px 1px 1px;
padding:0;
list-style:none;
}

blogroll ul a:link, .blogroll ul a:visited {
display:block;
width:252px;
padding:2px 10px 2px 10px;
text-decoration:none;
color:#93b8d3;
font-weight:normal;
}

.blogroll ul a:hover, .blogroll ul a:active {background:#366386;}
The final thing to note is that we currently have a space between our image and our drop-down. We can remove this by amending our CSS:
.blogroll p, .blogroll ul {margin:0;}

Now it's time to create the dropdown. The trick is very straightforward - We are going to use the div to hide everything other than the image until the user's mouse is over it.
To start with, let's hide everything other than our image.
.blogroll {
width:274px;
height:21px;
overflow:hidden;
}
And then we just use the :hover pseudo-class to allow the excess to be shown when the user scrolls over the image.
.blogroll:hover {overflow:visible;}
We are almost done. The rollover works, but when the menu appears, it pushes all the content beneath it down. This jumping content looks poor.
We are going to fix that by using absolute positioning to put the dropdown menu above all the other content. That way, there will be no jumping when the menu comes into play.
The first step is to amend the blogroll div to be positioned relatively (So that the dropdown's absolute positioning can be anchored by this div).
.blogroll {position:relative;}
Now use CSS to position the menu right under the image.
.blogroll ul {
position:absolute;
left:0;
top:21px;
}
This menu won't work with IE6 because it does not support :hover on anything other than links.
There are some workarounds to this using JavaScript. For instance, you could use conditional comments so that IE6 users use JavaScript to see the menu. Or you could try to teach IE6 to use :hover properly.
But given that the whole point of this was to avoid extra scripts, the best solution might be to simply hide the menu altogether. It's not crucial content and if as few of your reader's use IE6 as this site's does, your best bet may just be this:
.blogroll {display:none;}
html>body .blogroll {display:block;}
You can see the full code in working order on the example page. I love the control you have over it and the fact that you aren't using any scripts so load times are as fast as they can be.
Not supporting IE6 is a drawback, but not as serious a one as it could be. For instance, 14% of this site's visitors have JavaScript disabled, but only 2.6% are using IE6. That means that 5 times more people have a working blogroll than if I had used a JavaScript solution.
What do you think? Will you be using a CSS-only menu on your blog at some point, or do JavaScript effects still hold sway over you?
0 votes / 24,773 previews / 1 commentaire
09/11/2009
Le menus déroulants  est une excellente façon de comprendre une très longu...Comment faire pour créer une belle Dropdown Blogroll Sans JavaScript? - Comment faire pour créer une belle Dropdown Blogroll Sans JavaScript? - Langue: Française
Définir comme page d'accueil - Ajouter aux Favoris - Recommandez-nous - Newsletter - Google+


 09/11/2009
 1
1
hi Réponse
pakistani mujra,