


 15/07/2010
 2
2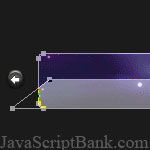 Dock Carousel is an awesome, unique and eye-catching navigation menu on the web pages, presented on jsB@nk recently. Please go to JavaScript DHTML Dock Carousel Using Mootools for this demo.
In this JavaScript tutorial article, the author shows you how to build this navigation menu, shows you the full steps from designing the backgrounds, icons for with Photoshop, coding CSS, HTML and JavaScript codes, applying the animations, implementing all of them ...
Because this is a very detailed JavaScript tutorial article, it should be divided into two parts, and this is the first one, please see the rest in the next post.
- Demo
- Enlarge
- Reload
- New window
Free iPage Web Hosting for First Year NOW
If you're still looking for a reliable web host provider with affordable rates, why you don't take a little of time to try iPage, only with $1.89/month, included $500+ Free Extra Credits for the payment of 24 months ($45)?
Over 1,000,000+ existisng customers can not be wrong, definitely you're not, too! More important, when you register the web hosting at iPage through our link, we're going to be happy for resending a full refund to you. That's awesome! You should try iPage web hosting for FREE now! And contact us for anything you need to know about iPage.
This tutorial will take you through creating the initial mockup in Photoshop, and creating a usable carousel that imitates the Mac OS X Leapard dock. This tutorial we’ll acquiant you well with creating a slick button, and using the shape tools. We want to deal with shape layers instead of pixel because of the non-destructive nature of shapes. Non-desctructive shapes means you can edit and scale without distortion.
Step 1
Create a photoshop and create a new document 540px x 308px. Fill the background with #232323.
Take the Rounded Rectangle Tool, set it to a 5px radius and create an object that is 350px by 50px. Make the color of this shape layer #303030. Make sure you have the tool set to the “Shape Layers” option instead of the paths option. That way, you are creating non-destructive shapes so you can go back and edit & reference them later without compromising distortion. Next, type out “CAROUSEL” (or whatever you like) at the top of the document with the color #080808. Find a good serif font like “Myriad Pro”. Apply the Inner Shadow below layer style to the text.
Step 2: Buttons
Next, we need to create buttons that will move the carousel from left to right. First, create a 20px circle shape with the color #232323 using the ellipse tool. Apply the following Bevel & Emboss and Gradient Overlay layer styles.

Now create a new white layer for the reflection. Start by creating another circle shape, and use Direct Selection Tool to mend the shape into the shape you see below. Move the handles (the line that is asymptotic to the path) of each point to change the curvature of the path. Set this layer to blending mode Overlay, and an opacity of 82%.
Next we need arrows to specify the direction. Take the pencil tool set to a 1px brush, and create a arrow out of pixels ontop of the button. Apply the following Drop Shadow and Inner Shadow to give the look that the arrow is imbedded in the button.
Finally for this step, group these three layers in a group and duplicate the group. Then with the group selected in the layer palette, Edit >> Transform >> Flip Horizontal. Place the buttons on either side of the stage.
Step 3: Stage
Now we’ll recreate a the Leopard dock. Fist we need the Leopard wallpaper. Place the image inside the Photoshop document, and use the shape made in step one to mask of the wallpaper layer. To do this, select the shape, and right click and pick “Make Selection”. Now with the selection, make a mask on the wallpaper layer. Click the little link connecting the mask to the image, to disassociate the mask with the layer, so you can move the image around without moving the mask around with it. Place the wallpaper in the correct place.
The next step is to create the shelf, create a white rectangle shape, and use the Direct Selection Tool to select the corners, and transform the shape to give it the perspective of a shelf. Again, we want to use the path of the original stage layer. This time though copy that path and paste the path into the shelf layer. With both paths selected, click the “Intersect Shapes area” button. Set the opacity of the stage to 51%.
Finally, we need to create a swoosh across the stage. Again, we want to create a shape, this time, use the pen tool to create the shape over the stage. Set the opacity of this layer to 14%.
Step 4: Icons
This step is more for mocking up the final product which we’ll be finished in Part 2, but drag 32px icons onto the dock. Space them appropriately.
When creating the icons for Part 2, we need to make sure that the icons are transparent and that the size of the icons are 40px or greater. To get best looking transparent icon, make sure you use the PNG-24 setting in the Save to Web palette. This will create the best looking transparent icon. If you export with GIF, you tend to get more jagged edges that look bad.
Step 5: Slicing and Exporting for the Web
Next we need to slice up the document to get it ready for the web. There should only be 4 slices in this document: the two buttons, the stage and the text. You can name each slice by taking Slice Selection Tool and double clicking on a slice. A panel will pop up with input to rename the slice, that way when you export, it will automatically name the images.
Now that you’ve sliced the image, go to File >> Save to Web… You can change the export setting for each slice, but for this particular document leave each slice as a gif. For more info on exporting, check out this article that walks through exporting for the web in Photoshop. When you go to save, make sure you change the option “Slice:” from “All Slices” to “All User Slices” so you don’t have unnecessary slices.
- Sent (0)
- New
Save up to 630$ when buy new iPhone 15
GateIO.gomymobi.com
Free Airdrops to Claim, Share Up to $150,000 per Project
https://tooly.win
Open tool hub for free to use by any one for every one with hundreds of tools
chatGPTaz.com, chatGPT4.win, chatGPT2.fun, re-chatGPT.com
Talk to ChatGPT by your mother language
Dall-E-OpenAI.com
Generate creative images automatically with AI
AIVideo-App.com
Render creative video automatically with AI
Cool Domains for Sale!
Author:
Previews:
Comment:
Votes:
Sent:
Size:
Rank:
Tutorial Dog [more]
21,876
2
0
0
0.32 KBytes
0 votes / 21,876 previews / 2 comment
15/07/2010
Dock Carousel is an awesome, unique an...How to Create JavaScript Dock Carousel Using Mootools - part 1 - How to Create JavaScript Dock Carousel Using Mootools - part 1 - Language: English

Reply
Reply