


 10/01/2011
 0
0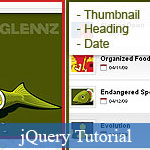 Như đã hứa, trong bài viết hôm nay, jsB@nk xin trình bày với bạn chi tiết cách thức để xây dựng Khung trưng bày ảnh tuyệt đẹp với jQuery với các giải thích đầy đủ.
Thật sự thì với sự hỗ trợ mạnh mẽ của thư viện jQuery, chúng ta chỉ cần xây dựng các hoạt hóa JavaScript cho hiệu ứng JavaScript chuyển ảnh chỉ với vài dòng mã lệnh JavaScript; nhưng bù lại chúng ta phải tốn nhiều thời gian hơn để định dạng (styling) cho giao diện.
- Demo
- Phóng to
- Tải lại
- Cửa sổ mới
Miễn phí web hosting 1 năm đầu tại iPage
Nếu bạn vẫn còn đang tìm kiếm một nhà cung cấp hosting đáng tin cậy, tại sao không dành chút thời gian để thử với iPage, chỉ với không quá 40.000 VNĐ/tháng, nhưng bạn sẽ được khuyến mãi kèm với quà tặng trị giá trên 10.000.0000 VNĐ nếu thanh toán cho 24 tháng ~ 900.000 VNĐ?
Có trên 1 triệu khách hàng hiện tại của iPage đã & đang hài lòng với dịch vụ, tuyệt đối chắc chắn bạn cũng sẽ hài lòng giống họ! Quan trọng hơn, khi đăng ký sử dụng web hosting tại iPage thông qua sự giới thiệu của chúng tôi, bạn sẽ được hoàn trả lại toàn bộ số tiền bạn đã sử dụng để mua web hosting tại iPage. Wow, thật tuyệt vời! Bạn không phải tốn bất kì chi phí nào mà vẫn có thể sử dụng miễn phí web hosting chất lượng cao tại iPage trong 12 tháng đầu tiên. Chỉ cần nói chúng tôi biết tài khoản của bạn sau khi đăng ký.
Nếu muốn tìm hiểu thêm về ưu / nhược điểm của iPage, bạn hãy đọc đánh giá của ChọnHostViệt.com nhé!
An image rotator is one great way to display portfolio pieces, eCommerce product images, or even as an image gallery. Although there are many great plugins already, this tutorial will help you understand how the image rotator works and helps you create your own from scratch.
Creating an Image Rotator
View Demo of Awesome JavaScript Image Rotator with jQuery
Step1. HTML - Image Rotator Wireframe
Start by building the html wireframe of the layout. As you can see in the image below, there will be two major sections (the main image section and the thumbnail list section). In addition to the sections for images, the third section, labeled "desc", will contain the main_image description.

main_image Section HTML
image_thumb Section HTML
Note - The thumbnail list section will be very similar in markup as the
main image section, but each will all be encapsulated in its own list
item.
Step 2. CSS - Image Rotator Wireframe
Next, it's time to style the image rotator's HTML wireframe with CSS.
main_image section CSS
width: 598px;
height: 456px;
float: left;
background: #333;
position: relative;
overflow: hidden; /*--Overflow hidden allows the description to toggle/tuck away as it slides down--*/
color: #fff;
}
.main_image h2 {
font-size: 2em;
font-weight: normal;
margin: 0 0 5px;
padding: 10px;
}
.main_image p {
font-size: 1.2em;
line-height: 1.6em;
padding: 10px;
margin: 0;
}
.block small { /*--We'll be using this same style on our thumbnail list--*/
font-size: 1em;
padding: 0 0 0 20px;
background: url(icon_calendar.gif) no-repeat 0 center;
}
.main_image .block small {margin-left: 10px;}
.main_image .desc{
position: absolute;
bottom: 0;
left: 0; /*--Stick the desc class to the bottom of our main image container--*/
width: 100%;
display: none; /*--Hide description by default, if js is enabled, we will show this--*/
}
.main_image .block{
width: 100%;
background: #111;
border-top: 1px solid #000;
}
.main_image a.collapse { /*--This is our hide/show tab--*/
background: url(btn_collapse.gif) no-repeat left top;
height: 27px;
width: 93px;
text-indent: -99999px;
position: absolute;
top: -27px;
right: 20px;
}
.main_image a.show {background-position: left bottom;}
image_thumb section CSS
float: left;
width: 299px;
background: #f0f0f0;
border-right: 1px solid #fff;
border-top: 1px solid #ccc;
}
.image_thumb img {
border: 1px solid #ccc;
padding: 5px;
background: #fff;
float: left;
}
.image_thumb ul {
margin: 0;
padding: 0;
list-style: none;
}
.image_thumb ul li{
margin: 0;
padding: 12px 10px;
background: #f0f0f0 url(nav_a.gif) repeat-x;
width: 279px;
float: left;
border-bottom: 1px solid #ccc;
border-top: 1px solid #fff;
border-right: 1px solid #ccc;
}
.image_thumb ul li.hover { /*--Hover State--*/
background: #ddd;
cursor: pointer;
}
.image_thumb ul li.active { /*--Active State--*/
background: #fff;
cursor: default;
}
html .image_thumb ul li h2 {
font-size: 1.5em;
margin: 5px 0;
padding: 0;
}
.image_thumb ul li .block {
float: left;
margin-left: 10px;
padding: 0;
width: 170px;
}
.image_thumb ul li p{display: none;}/*--Hide the description on the list items--*/
Step3. jQuery - Image Rotation Effect
If you are new to jQuery or have not had much experience with it, first go over the basics.
Show Image Description and Set Transparency on Block
To degrade gracefully, the image banner description is set to be hidden
at default with CSS (refer to the ".main_image .desc" class in the
CSS). We will show the image description if JavaScript is enabled.
$(".main_image .block").animate({ opacity: 0.85 }, 1 ); //Set Opacity
Click and Hover Events for Image List
The following script will change the main_image when a list-item in the
image_thumb is clicked. Each line also contains a comment explaining
which jQuery actions are being performed.
$(".image_thumb ul li").click(function(){
//Set Variables
var imgAlt = $(this).find('img').attr("alt"); //Get Alt Tag of Image
var imgTitle = $(this).find('a').attr("href"); //Get Main Image URL
var imgDesc = $(this).find('.block').html(); //Get HTML of the "block" container
var imgDescHeight = $(".main_image").find('.block').height(); //Find the height of the "block"
if ($(this).is(".active")) { //If the list item is active/selected, then...
return false; // Don't click through - Prevents repetitive animations on active/selected list-item
} else { //If not active then...
//Animate the Description
$(".main_image .block").animate({ opacity: 0, marginBottom: -imgDescHeight }, 250 , function() { //Pull the block down (negative bottom margin of its own height)
$(".main_image .block").html(imgDesc).animate({ opacity: 0.85, marginBottom: "0" }, 250 ); //swap the html of the block, then pull the block container back up and set opacity
$(".main_image img").attr({ src: imgTitle , alt: imgAlt}); //Switch the main image (URL + alt tag)
});
}
//Show active list-item
$(".image_thumb ul li").removeClass('active'); //Remove class of 'active' on all list-items
$(this).addClass('active'); //Add class of 'active' on the selected list
return false;
}) .hover(function(){ //Hover effects on list-item
$(this).addClass('hover'); //Add class "hover" on hover
}, function() {
$(this).removeClass('hover'); //Remove class "hover" on hover out
});
Toggle the Hide/Show Option
This is fairly simple. On each click, either show or hide the description.
$(".main_banner .block").slideToggle(); //Toggle the description (slide up and down)
$("a.collapse").toggleClass("show"); //Toggle the class name of "show" (the hide/show tab)
});
View Demo of Awesome JavaScript Image Rotator with jQuery
Conclusion
Do keep in mind these jQuery driven image rotators do not degrade in the best fashion. As you can see, when you disable JavaScript, each thumbnail must be clicked on to get the larger image (which opens in the same window). But for those who have a user base with JavaScript enabled, you are in the clear and it can be used and customized to fit various scenarios.
Experiment and customize this to fit your needs. If you have any questions, concerns, suggestions, or comments, please do not hesitate to let me know.
Credits: Much appreciation to Glenn Jones for allowing me to use his beautiful illustrations for the example images.
- Lượt gửi (0)
- Mới
Save up to 630$ when buy new iPhone 15
GateIO.gomymobi.com
Free Airdrops to Claim, Share Up to $150,000 per Project
https://tooly.win
Open tool hub for free to use by any one for every one with hundreds of tools
chatGPTaz.com, chatGPT4.win, chatGPT2.fun, re-chatGPT.com
Talk to ChatGPT by your mother language
Dall-E-OpenAI.com
Generate creative images automatically with AI
AIVideo-App.com
Render creative video automatically with AI
Cool Domains for Sale!
Tác giả:
Lượt xem:
Lời bình:
Lượt đánh giá:
Lượt gửi:
Kích thước:
Thứ hạng:
Soh Tanaka [more]
21,561
0
0
0
0.09 KBytes
0 lượt đánh giá / 21,561 lượt xem / 0 lời bình
10/01/2011
Như đã hứa, trong bài viết hôm nay, jsB@nk xin trình bày với bạn chi tiết cách thức để xây dựn...Hướng dẫn tạo khung trưng bày ảnh tuyệt đẹp với jQuery - JID: 2522 - Hướng dẫn tạo khung trưng bày ảnh tuyệt đẹp với jQuery - Ngôn ngữ: tiếng Việt
